Kent-Drury
English 349
Creating Link & Image Rollovers
Note: To view the behaviors described on this handout, view
this page online at http://www.nku.edu/~rkdrury/349/handouts/rollovers.htm.
Changing Link Colors on Rollover
To create rollover links with text (i.e., when the mouse moves over the link,
it changes color), use the following procedure:
Example:
Northern Kentucky University
- Open the page you want to modify in Dreamweaver.
- Click the "Page Properties" button on the Property inspector (probably
at the bottom of the page).
- Choose the category "Links."
- For each type of link (Link, Alink, Vlink, Rollover), use the color picker
to set the color. If you want to change the default setting that links are
underlined (for instance, you may want to have the underlining show up only
when the mouse is over the link, or you want all links to be boldface), this
is the place to do it.
- Click "OK."
Image Rollovers
Example:

Rollover images create the illusion that a button has changed
because of a user action. In actuality, rollover images swap one image for
another when the user performs a particular action. To set up a rollover image
when the user moves the mouse over an image:
- Create/find the two images you want to use for a simple rollover. Save
them as part of your site.
- Open the file in which the rollover image will appear. Position the cursor at the insertion point. Choose Insert>Image Objects>Rollover Image. A popup box will appear.
- The default name for the image will be in the form "Image#". Change this name to something descriptive that you'll remember.
- Navigate to your Original image (the one that shows up initially on the page)
and your Rollover image (the one that appears when you move your mouse over
it).
- Describe the button in the Alt Text box (this helps to make your site ADD compliant; that is, sight impaired people
will not get stuck because they can't see your image).
- Enter the URL of the site you want to appear when the button is clicked.
- Click "OK." Preview the result in a browser by clicking File>Preview in
Browser>browsername. It should work!
Inserting a Navigation Bar With Button Images
Example: The following instruction was used to produce the navigation bar in the page at http://www.nku.edu/~rkdrury/349/handouts/navigation_bar_example.html
- In Fireworks, Photoshop,
or some other graphics program, create button images for all of the buttons that will appear in your navigation bar. You will need at least an "Up image" and "Over image" for every button. Be certain that you save the images, in "GIF" or "JPG" format, to your site directory.
- Open a file and position the cursor where you want the navigation bar to appear.
- Choose Insert>Image Objects>Navigation Bar. The following popup window will appear:
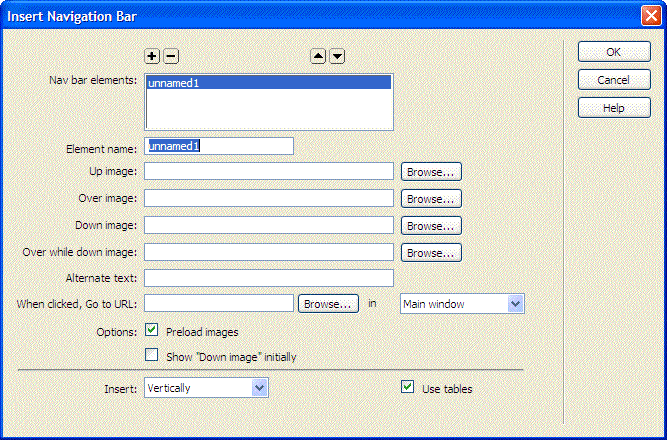
- In the "Element name" field, enter a descriptive name for the first element in your navigation bar (e.g., "Home").
- Click in the "Up image" field. Browse to find the up-image for the element.
- Click in the "Over image" field. Browse to find the over-image for the element.
- If desired, continue with a "Down image" and an "Over while down image."
- Add descriptive "Alternate text" to make your page ADD compliant.
- Enter the complete URL for the page to which the navigation bar element will be linked.
- Select the option "Preload images."
- In the "Insert" field, choose either "Horizontally" or "Vertically," depending upon whether you want a vertically stacked navigation bar or a horizontal navigation bar that spreads across the page.
- Click the "use tables" radio box. The first element in your navigation bar is complete.
- Click the "+" at the top of the screen, then repeat steps 4-12 for each additional element of your navigation bar.
- Click OK when all elements have been added to your navigation bar.